Project Management
Project Administration
Collaboration in PromethistAI happens inside projects. A person can access a project in two ways:
-
through their account role, which applies to every project in the account, or
-
through a project role, granted on this project only.
When someone has both, the higher role wins.
Project Members
Project → Members shows everyone who can access the project. It is visible to project Owners, and account Owners are Owners of every project. The list shows:
-
direct project members, with their project role, and
-
account members at the bottom, with their account role shown as Account Owner, Account Editor or Account Viewer.
Subject |
The member’s email address (tag User), or an identity-provider role (tag IdP Role). |
Role |
The project role, or the account role for account members. |
Created / Last Modified |
When access was granted and last changed. |
Modified By |
Who made the last change. |
Actions |
Edit Role and Remove, or Leave on your own row. |
Adding Project Members
To add someone to this project only:
-
Go to Project → Members and click Grant Access.
-
Enter their email addresses, choose a Role, and choose Grant directly or Send invitation.
-
Click Grant Access, or Send Invitations.
The steps are the same as for the account. See Granting Access.
|
Pending project invitations are listed in the Invitations table below the members, where you can revoke them or copy their link. See Invitations.
Editing Roles
Roles control what members can see and do inside a project:
Owner |
Full control of the project, including Project → Members: granting access, inviting members and assigning roles. |
Editor |
Can create, edit, clone, archive and delete agents and all project assets (knowledge, integrations, interactive content, evaluations, tests), and edit Project Settings. |
Viewer |
Read-only access to project content, settings and analytics. |
Creating new projects requires an account role of Editor or Owner. Billing is managed at account level by account Owners. See Roles & Permissions.
Project roles also affect which agents members see in the client. Everyone sees the project’s Published agents. Members of the project also see Preview agents, and Owners and Editors additionally see Draft agents. See Home Screen.
To change a role:
-
Click Edit Role on the member’s row, or click the row.
-
Choose a new Role.
-
Click Edit to confirm.
Revoking Access
Members can be removed at any time:
-
Click Remove on the member’s row.
-
In Revoke access, click Confirm.
Project Settings
Projects also define how agents appear to end users in the PromethistAI clients. Administrators can customize branding so that the visual presentation of agents reflects the organization’s identity, keeping the experience consistent with the enterprise brand even though it is delivered through the PromethistAI application.
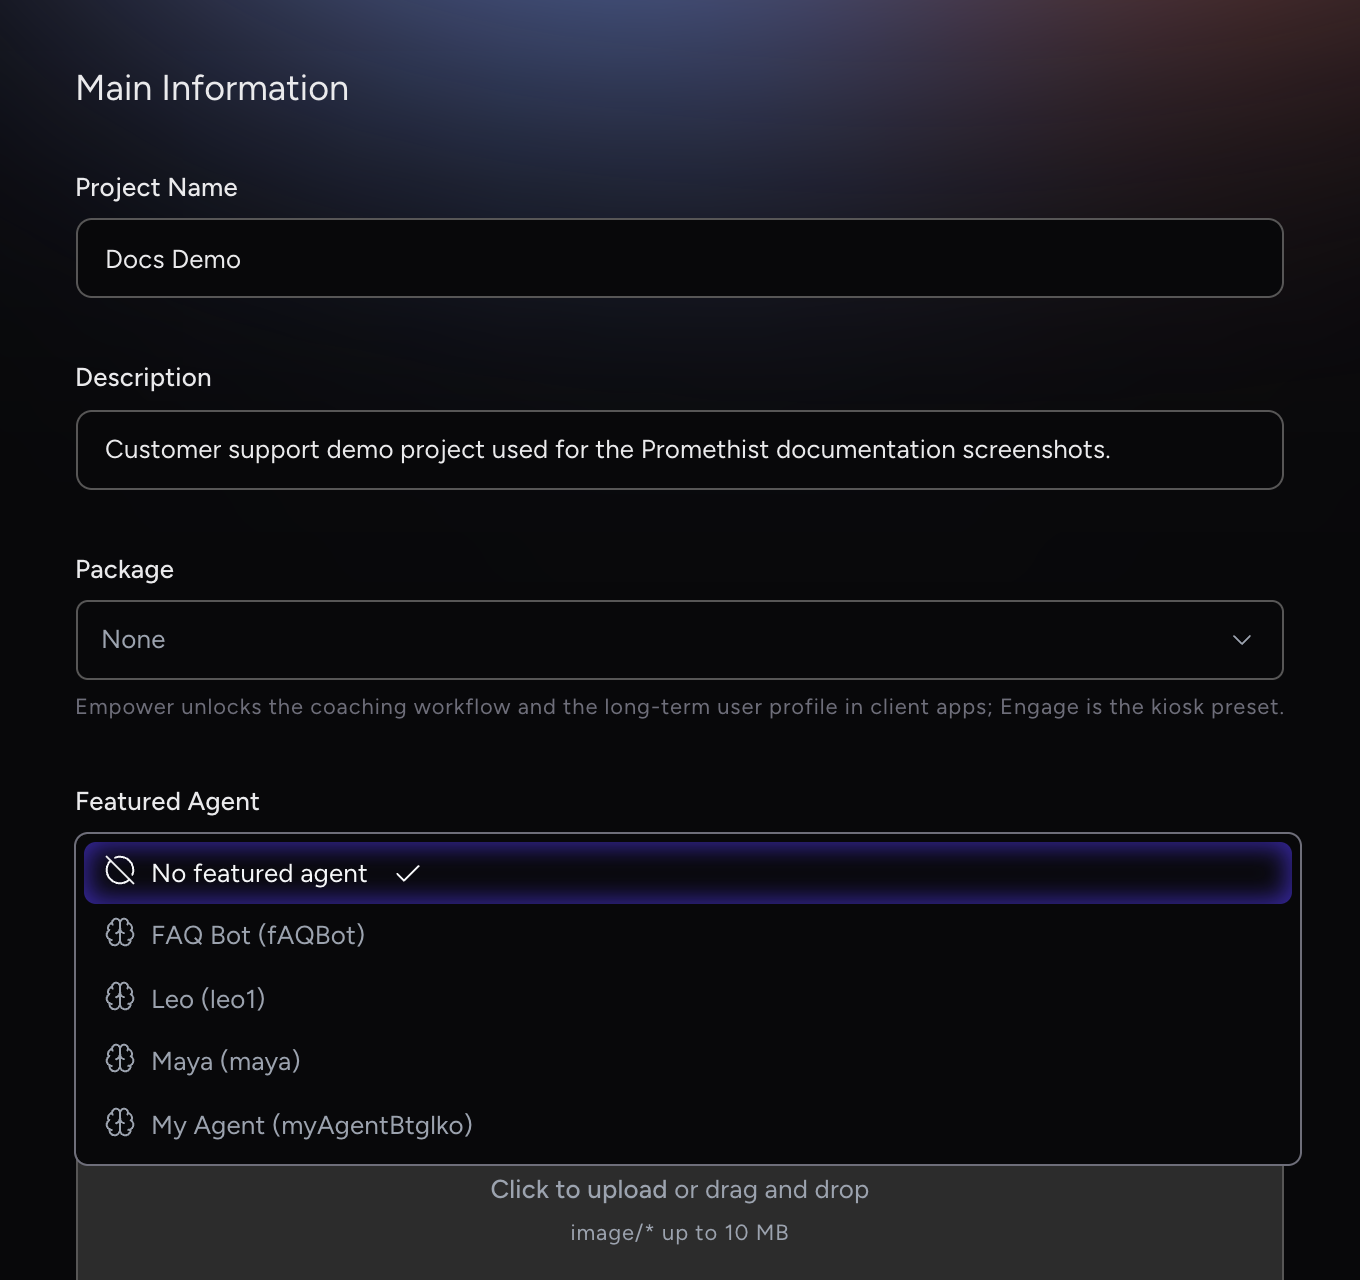
Under Project → Settings you can set:
- Project Name and Description
-
How the project is identified.
- Package
-
The use case the project is set up for:
Empower
Sales coaching with roleplay agents. Unlocks the coaching workflow and the Profile tab in the client apps, where each user’s results from User Facing evaluations build up over time.
Engage
Kiosk-style visitor engagement, lead capture and product showcasing. In a project set to Engage, the client apps don’t show results in the Profile tab.
None
No package preset.
Choose the package that matches how people will use the project. You can change it later in Project → Settings. See Home screen for what the client apps show.
- Featured Agent
-
Optional. The agent the project leads with, shown at the top of the home screen in the client. Without one, the client shows the project’s name and description instead. A project has one Featured Agent. It is marked with a Featured tag in the Agents listing, and it can receive evaluation results from other agents (see Evaluations). Choose No featured agent to remove it. Archived agents can’t be selected.
- Logo
-
Shown in the top left of the client when the project is active. Click to upload or drag and drop an image (up to 10 MB), then crop it.
- Primary and Secondary Color
-
Applied in the client near the call to action, with a live preview beside the color fields.
- LiveAvatar API Key
-
See below.
Click Save Changes to apply.
|
LiveAvatar API Key
The LiveAvatar API Key is the key used for the LiveAvatar stream Avatar Source. Paste the key from your LiveAvatar (HeyGen) account in the project’s Main Information settings.
You can set a LiveAvatar API Key at both the project level and the account level.
|
If only one key is set, that key is used. If both are set, the project-level key takes precedence over the account-level key. Clear the project key to fall back to the account key. |
Terms and Conditions
Write the terms people have to accept in the Terms and Conditions editor. The toolbar adds headings, lists and other formatting. Click Save Changes to apply them.
As the note in Studio says, the terms are shown in the client app before people can talk to the project’s agents, and everyone has to accept them. Leave the editor empty for no terms.
|
Any change to the terms asks every user to accept them again. Check the text before you save. |
To remove the terms, empty the editor and click Save Changes. In the Remove terms and conditions? dialog, click Remove Terms. The app then stops asking people to accept them. Adding terms again later asks every user to accept them.
If saved terms contain a numbered list that doesn’t start at 1, Studio warns that saving a change renumbers it from 1.
Feedback Surveys
Feedback Surveys ask users in the app for feedback after a conversation or when they open the project. Changes to surveys apply immediately, without Save Changes.
Click Add survey to create one. Each survey in the list shows its name, a short summary, a switch to show or hide it in the app, and buttons to edit or delete it. Owners and Editors can change surveys; Viewers can only see them.
In the survey editor:
- General
-
Name (only shown in Studio), Description and Active. Only active surveys are shown in the app.
- When to ask
-
After a conversation: when the user ends a conversation, before the evaluation results. When the project opens: each time the user opens the project in the app, until they respond.
- How often
-
Intelligently (recommended): once a user has had 5 conversations, 45 minutes in total, over at least 7 days. Periodically: daily, weekly, monthly or after every conversation. Usage-based: after a number of engaged conversations or minutes in conversation. Turn on Ask each user only once to ask a user a single time.
- Conversation length
-
For surveys after a conversation: how many turns make an engaged conversation. You can set separate questions for engaged and short conversations, and choose whether to ask after short conversations at all.
- Questions
-
Add question adds one question, Add question carousel adds a titled set of questions. Answer types: Thumbs up / down, Star rating, Linear scale, Single choice, Multiple choice and Text answer. A new survey starts with two example questions you can change.
Click Create Survey, or Save Changes for an existing survey. Deleting a survey stops the app from showing it right away; answers users already gave are kept.
SSO and Identities
For enterprises requiring secure distribution, projects can be tied to Single Sign-On (SSO). When a project is secured by your identity provider, user identities and entitlements flow directly into the PromethistAI clients. This means that only authorized employees, partners, or customers see the agents they are entitled to access, and access can be managed centrally through the organization’s identity provider.
Identity providers are set per project, under Project → Identity Providers. Only project Owners and account Owners see this page. It lists the project’s providers with their logo, name and ref, and a status:
In Keycloak |
Promethist’s sign-in system has an identity provider with this ref. |
Not in Keycloak |
No identity provider with this ref exists in the sign-in system yet. |
Not verified |
The sign-in system couldn’t be reached to check the ref. |
|
A provider has to exist in Promethist’s sign-in system (Keycloak) before you can add it. To connect a new one, such as Okta, Microsoft Entra ID or Google Workspace, click Request SSO setup under Connect a new identity provider. This opens a pre-filled request to the PromethistAI team. |
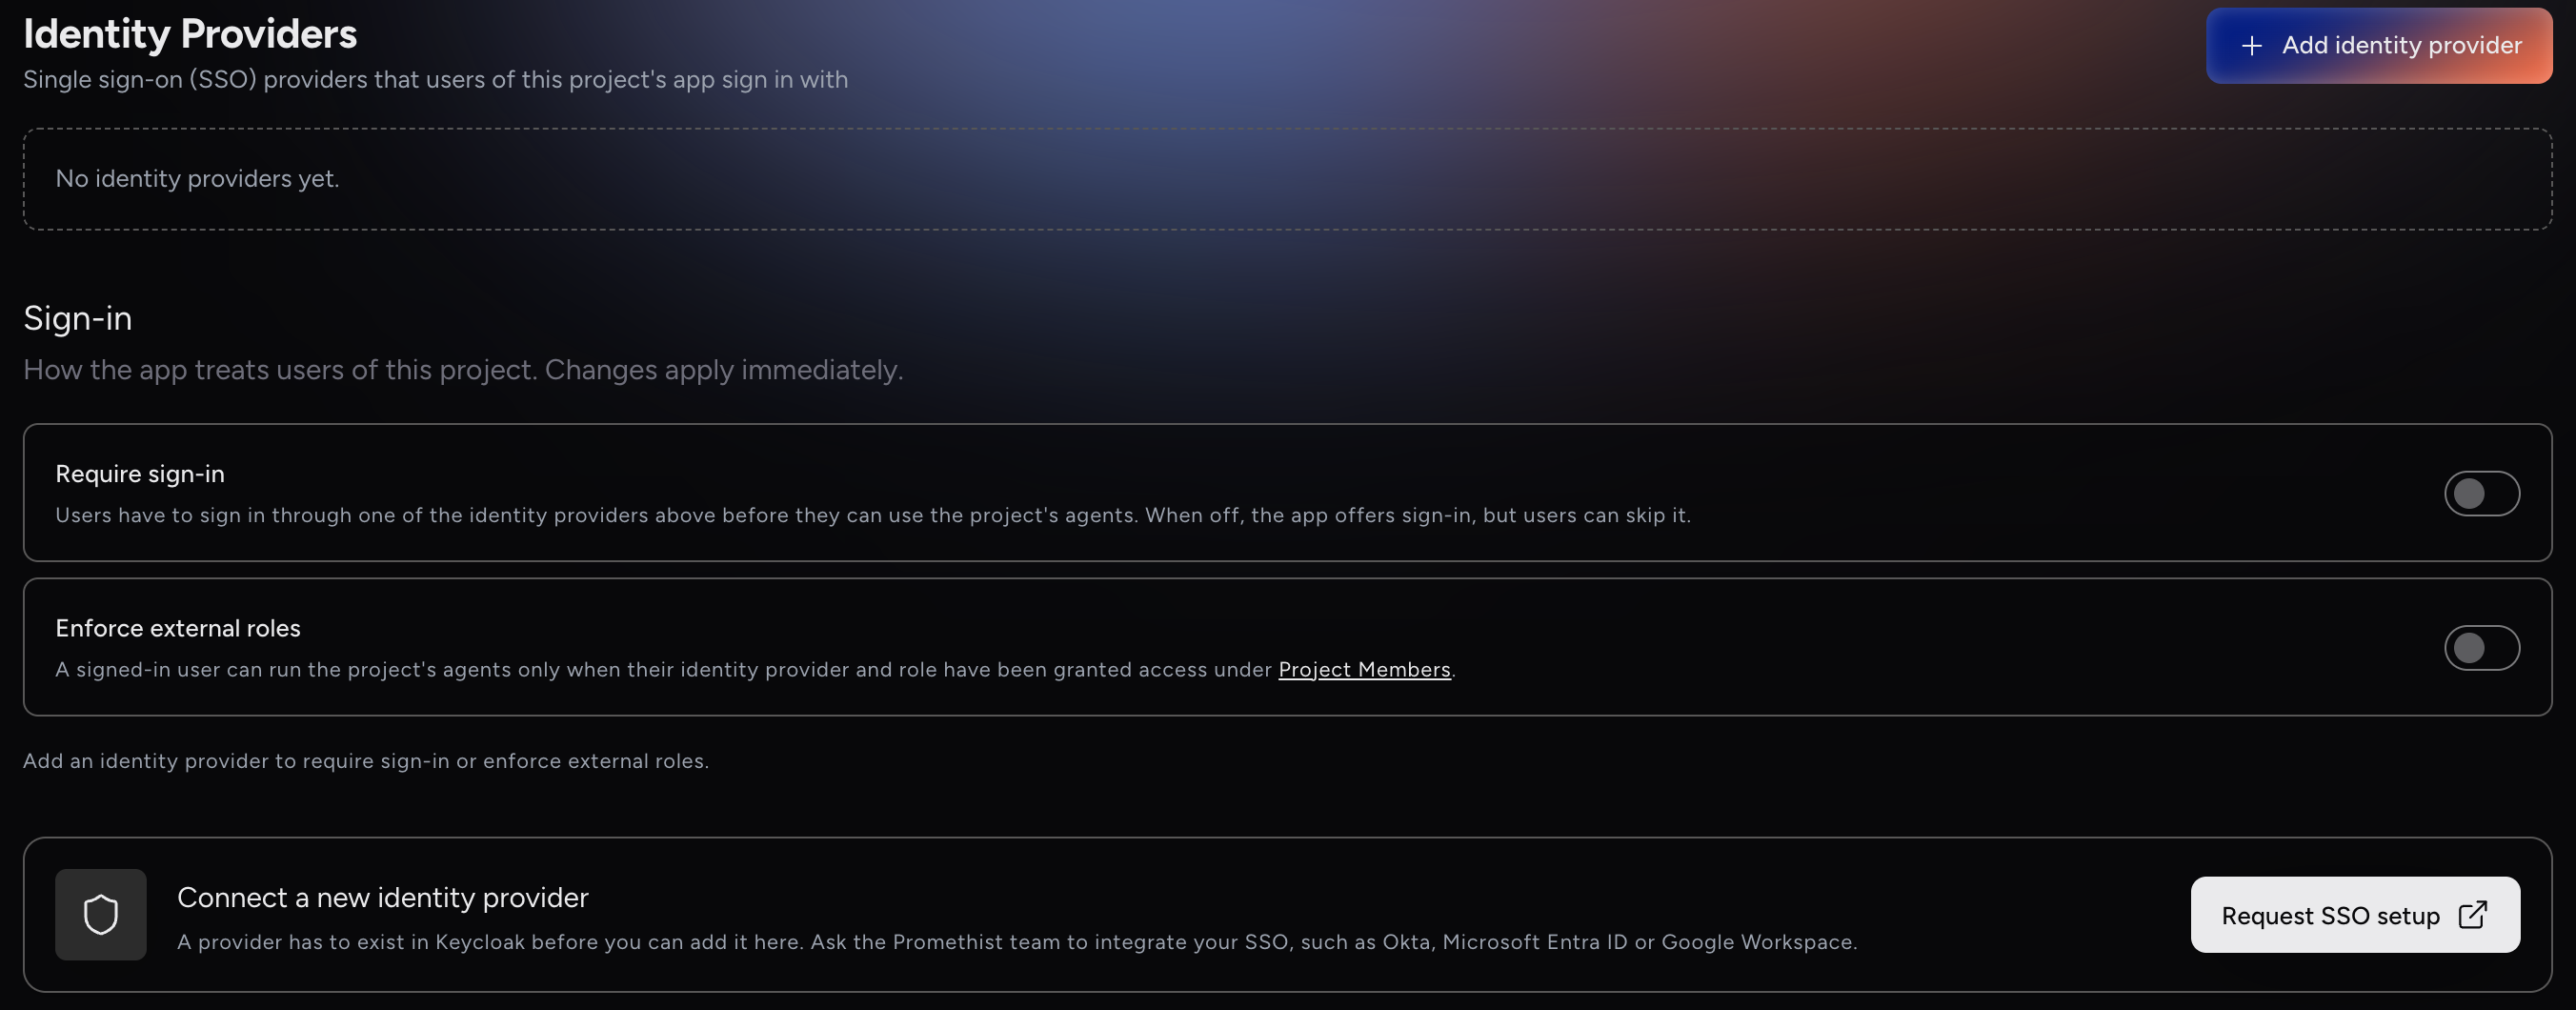
To add a provider:
-
Click Add identity provider.
-
Enter the Ref: the alias of a provider that already exists in Keycloak. Studio checks it when you save.
-
Enter the Name, shown to users on the sign-in button in the app.
-
Optionally enter a Logo URL, the image shown next to the name.
-
Click Add.
Use Edit or Remove on a provider’s row to change or remove it.
Under Sign-in, two switches set how the app treats users of the project. Changes apply immediately, and both need at least one provider; removing the last provider turns them off.
- Require sign-in
-
Users have to sign in through one of the project’s identity providers before they can use its agents. When it’s off, the app offers sign-in, but users can skip it.
- Enforce external roles
-
A signed-in user can run the project’s agents only when their identity provider and role have been granted access under Project → Members. See Identity-provider roles.
|
SSO and identity features are available as part of the enterprise offering and can be enabled by contacting the PromethistAI Sales team. |
Identity-provider roles
Once the project has an identity provider, Grant Access on Project → Members also accepts roles from your identity provider. Anything you enter that isn’t an email address is treated as an identity-provider role, and it appears in the members list with an IdP Role tag.
• |
Identity-provider roles are always granted directly. No invitation is sent. |
• |
If the project has more than one identity provider, choose the Identity Provider the role belongs to. |
• |
The Consumer role is available for these projects. Consumers can only talk to agents in client apps and have no Studio access. |
To remove an identity-provider role, click Revoke Access on its row.
Agents Listing
Assets › Agents lists the project’s agents, both Relational and Lightweight. It has two tabs, Active (n) and Archived (n), each showing how many agents it holds. For each agent, the list shows its newest revision, so a Published agent with a newer Draft appears as that Draft. From here you can:
-
Open an agent to edit it.
-
Clone an existing agent to reuse its configuration (see Cloning Agents).
-
Archive those no longer active (see Archiving Agents).
-
Create new agents with + Create (see Creating a New Agent for the full process).
-
Open the project in the client with Open Project. This button only appears once at least one agent in the project is Published.
Viewers see the list but can’t create, clone or archive agents. Simulated users used for automated testing are not listed here. They live under Test › Simulated Users (see Automated Testing).
The agent set as the project’s Featured Agent is marked with a Featured tag in the listing, so you can tell at a glance which agent is the project default. Set the Featured Agent in Project Settings.
A Project often contains multiple Relational Agents working toward the same goal. For instance:
-
In a support Project, one Relational Agent may handle FAQs, another processes warranty claims, and another escalates complex cases.
-
In a training Project, one Relational Agent might welcome new employees, another deliver compliance lessons, and another manage leadership development.
The listing provides visibility and control so that all these Relational Agents stay aligned.
Cloning Agents
To reuse an existing agent’s configuration as the starting point for a new one, use the Clone action in the Actions column and confirm. The copy is a new Draft named "<agent name> - clone", with the same configuration and attached evaluations, which you can rename and adjust. Cloning works on the Archived tab too, which is the only way to reuse an archived agent.
Archiving Agents
To remove an unused agent from the active list, use the Archive icon in the Actions column. The confirmation dialog tells you how many revisions will be archived and warns you if any of them is currently in Preview or Published. Archiving takes those revisions offline immediately.
Archived agents move to the Archived tab.
|
Archiving is permanent. Once an agent is archived, it cannot be restored or returned to active status. If you need it again later, clone it from the Archived tab. |